#how to use coreldraw
Explore tagged Tumblr posts
Visit Tumblr Blog
Explore Tumblr blogs with no restrictions, modern design and the best experience.
Last Seen Tumblr Blogs


Fun Fact
Premium Tumblr themes are available from anywhere between $9 to $49.
Text

Vash in Vector [IMG ID: Vash the Stampede from Trigun, mid-Trigun Maximum manga style. A young man with hair that is half-blond, half black with blue-green eyes and a big weird red duster coat. He is in profile looking off into the distance against a blue sky with stylised clouds. / END IMG ID] Drawn for Tritober Draw Challenge. More than a day late. October 1 Prompt: Vash the Stampede Do you want to know how to torture yourself? Do you really want to know how to torture yourself as an artist? You pick out a program that you are teaching yourself that's close to a program you barely used (only used for logo design and things of that nature) and you decide to do a whole darn picture in VECTOR just to play around with the freehand tool. Gah! This took me forever, lots of messing up on getting shapes right / to close properly and even finding the color palettes and sliders to play with! Vector drawing in CorelDraw 2021, exported to PNG.
#trigun#trigun maximum#vash the stampede#vector drawing#fanart#tritober#tritober 2024#tri-tober#trigun drawtober#drawtober
14 notes
·
View notes
Text
🇲🇽 Mexico 2025 Gold Cup Font – Customize Your Jersey Like El Tri!

Get ready for the 2025 CONCACAF Gold Cup with the official Mexico Jersey Font. You can print your name or honor stars like Lozano, Santi Giménez, or Ochoa. This font pack has everything you need to make your own jersey at home.
👉 Get the Mexico 2025 Gold Cup Font on Etsy Here
🇲🇽 Adidas Mexico 2025 Gold Cup Kit + Font Collection
The Adidas Mexico 2025 Gold Cup Kit was released on March 14, 2025. It debuted in the Concacaf Nations League semi-final against Canada. This kit is a bold design that honors Mexican culture and tradition.

🔥 Design Features:
The kit is black with gold accents, inspired by Mariachi clothing
A special pixelated font mimics Aztec pyramids and architecture
The unique stepped and blocky numbers resemble historic pyramid structures like Teotihuacan and Chichen Itza
Green Trefoil keeper shirt provided by Adidas
A full merchandise collection was released alongside the jersey

This kit combines modern wear with ancient symbols, making it one of Mexico’s most stunning kits.
✍️ What’s Included in the Font Pack
✅ OTF & TTF Font Files (for easy installation)
✅ Perfect for Cricut, Silhouette, etc.)
✅ Numbers 0-9 & Full Alphabet
✅ Pixel-style font inspired by Aztec pyramids
✅ Perfect for fans, creators, and gift-makers
youtube
🖨️ How to Use and Print the Font
Want to customize a jersey with your own name or your favorite player’s number? Here's how:
How to Use the Font:
Download the font from Etsy after purchase
Install the OTF or TTF file on your computer
Use design tools like Canva, Cricut Design Space, or Illustrator
Choose your name + number layout
Print it using DTF paper or HTV (heat transfer vinyl)
Apply the print using a heat press
Done! You’ve created your custom Mexico jersey 🔥
💻 Best 5 Tools for Font Design
Here are our top picks to design with ease:
Canva – Easy-to-use and beginner-friendly
Cricut Design Space – Ideal for precise cutting
Adobe Illustrator – Pro-level vector editing
CorelDRAW – Another great option for advanced designers
Inkscape – Free, open-source alternative to Illustrator

🛍️ Why Buy from Etsy?
Etsy is a secure and trusted platform that supports independent creators. Buying from our official Etsy store guarantees:
Instant download after payment
Secure transactions
High-quality files
Personal use license
Fast customer support from real designers
👉 Get the Mexico 2025 Gold Cup Font on Etsy Here
❓ FAQ – Mexico Gold Cup Jersey Font
Can I use this with Cricut or Silhouette? Yes, the download includes SVG and AI files.
Is this the official font? It’s a fan-made version based on the 2025 Gold Cup jersey design.
Can I print my own name and number? Absolutely! The font is fully editable for any name or number.
Is it for personal or commercial use? This license is for personal use only.
How do I print it on a shirt? Use DTF or HTV paper and a heat press machine.
#Font Football#Font football jersey#Mexico 2025 Gold#Mexico 2025 Gold font#font#font design#fonts#fonts & typography#football#football jerseys#football numbers#jersey#soccer font#Soccer typography#TTF#OTF#script writing#Font script#mexico#Youtube
3 notes
·
View notes
Text
VFX Era: Your Future Begins with Graphic Designing Course in Kanpur

VFX Era is redefining creative education in Uttar Pradesh through its comprehensive graphic designing course in Kanpur. Combining artistic training with career-readiness, this course equips learners with both the vision and the tools to become successful design professionals. Whether you're a recent school graduate or a mid-career switcher, VFX Era has built a design ecosystem that blends theory, practice, and professional mentorship.
What makes VFX Era unique is its complete learning cycle. From learning tools like Adobe Photoshop and Illustrator to understanding brand identity, visual storytelling, and user interface design, students are nurtured into becoming designers who solve real-world problems.
Why VFX Era's Graphic Designing Course in Kanpur Is the Ideal Starting Point
The growing demand for visual content across industries has created a need for trained graphic designers who are not just tool-users but thinkers and creators. VFX Era’s graphic designing course in Kanpur is designed to meet this demand with a practical, future-focused approach. Here, you don’t just learn how to use design software — you learn how to build brands, shape user experiences, and communicate visually.
From logos and brochures to social media content and website layouts, students work on real-time projects that mirror the needs of businesses today. This course doesn’t just prepare you to enter the industry—it prepares you to stand out in it.
The VFX Era Learning Philosophy: Creative, Practical, Professional
At the core of VFX Era’s teaching model is a blend of hands-on practice and conceptual clarity. The course aims to empower students with skills that are instantly applicable in the job market:
Understanding how design solves business problems
Translating ideas into visual campaigns
Creating cross-platform consistency for brand visuals
The course also introduces students to design systems and workflows that are used by professionals in advertising agencies, startups, eCommerce platforms, and global brands.
Course Structure: From Fundamentals to Industry-Level Mastery
Here’s a breakdown of what the curriculum covers:
Design Principles: Color theory, visual hierarchy, composition
Image Editing: Retouching and visual manipulation using Adobe Photoshop
Vector Graphics: Logo and icon creation using Illustrator and CorelDRAW
Typography: The art of readable and brand-oriented text design
Layout and Publishing: Flyers, posters, banners, and social media creatives
UI/UX Basics: Designing for websites and mobile apps
Brand Identity Projects: Packaging, logo kits, visual guidelines
In addition to these, students also receive special training in:
Freelancing and client handling
Building an online design portfolio
Content design for social media platforms
Basics of animation and motion graphics
Project-Based Learning at VFX Era
Every module is accompanied by a project. This means by the end of the course, each student has an impressive portfolio that includes:
Company logos
Product packaging
Event banners
Ad creatives
Website UI samples
Infographics and visual resumes
Students also receive reviews on their projects, just like in real agency settings. These critiques from mentors help learners understand what employers and clients expect.
Career Pathways After a Graphic Designing Course in Kanpur
The beauty of a graphic designing career is its versatility. After completing this course, you can work in:
Digital Marketing Agencies
Media and News Companies
Corporate Design Teams
Freelance Marketplaces
Startups and E-commerce Brands
You can also specialize in:
Branding Design
Social Media Content
Web Graphics
Packaging Design
Presentation & Pitch Deck Design
And if you want to scale further, combining your design skills with digital marketing or front-end development knowledge creates a competitive profile for roles like UI Designer or Digital Content Strategist.
The Role of Mentors in Your Creative Growth
Unlike self-paced online tutorials, the VFX Era experience is guided by mentors. These are industry professionals who:
Review your design drafts
Provide actionable feedback
Teach shortcuts and design hacks
Guide you on pricing, pitching, and professionalism
This mentorship accelerates learning, builds confidence, and prepares students for freelance gigs or full-time jobs.
The Power of Design in Kanpur’s Business Ecosystem
Kanpur is no longer just an industrial city. With the digital boom, local businesses are investing in branding, social presence, and customer engagement. From cafés and real estate firms to coaching centers and eCommerce brands, every business needs visual design.
As a certified designer from VFX Era, you can help these brands:
Build recognition through visual identity
Enhance online reach through engaging content
Improve customer retention through consistent visuals
And the best part? You can do all this while working from home or even as a part-time freelancer.
Expand Your Horizons: Combine Graphic Designing with Digital Marketing & Web Development
VFX Era doesn’t just stop at design. For students who want to expand their skillset, the institute also offers:
A full-fledged digital marketing course in Kanpur, where students learn SEO, PPC, email campaigns, and influencer marketing.
A practical web development course in Kanpur, covering HTML, CSS, JavaScript, and responsive design to build fast, beautiful websites.
By learning how your designs can integrate with marketing and web technologies, you’ll stand out as a full-stack creative professional.
Portfolio Building and Career Support
The course ends with a powerful capstone project and a complete review of the student’s portfolio. But VFX Era goes a step further by helping students:
Create Behance and Dribbble profiles
Draft a winning freelance pitch
Appear for mock interviews and client meetings
Build a design CV and pitch deck
Get referrals to freelance clients and agencies
This comprehensive support ensures you don’t just complete a course—you start a new career.
Final Thoughts: Why VFX Era Is the Top Choice for Graphic Designing Course in Kanpur
There are many ways to learn graphic design, but only VFX Era combines:
Experienced mentors
Real-world projects
Personalized feedback
Industry connections
Career-focused curriculum
That’s why it has become the most trusted name for anyone looking to become a designer in Kanpur.
Address: 117/H1/368 Pandu Nagar Neer Cheer Chauraha, Pandu Nagar, Kakadeo, Kanpur, Uttar Pradesh 208005 Contact: 063904 67467 Website: https://vfxera.com
If you’ve ever wanted to build a creative career, launch your own brand, or work in design globally — your journey starts here. Join the graphic designing course in Kanpur at VFX Era and unlock your true creative potential.
2 notes
·
View notes
Text
Maximize Your Printing Efficiency: The Ultimate Guide to Gang Sheet DTF Transfers for Custom Designs
Introduction
Hey there! If you're looking to streamline your printing process and discover a fabulous method for creating custom designs, you’ve landed in the right spot. In this ultimate guide, we’re diving into the world of gang sheet DTF transfers. Trust me; it’s a game-changer for anyone involved in the printing industry. Whether you’re running a small business or managing a larger commercial operation, understanding how to maximize your printing efficiency can save you time, effort, and money. So, roll up your sleeves, and let’s get started!
Maximize Your Printing Efficiency: The Ultimate Guide to Gang Sheet DTF Transfers for Custom Designs What is DTF Printing?
Direct to Film (DTF) printing is one of those innovative technologies that have transformed the way we think about fabric customization. Instead of traditional methods like screen printing or heat transfer printing that can be quite limiting, DTF allows for vibrant colors and complex designs on various fabrics with ease.
Key Features of DTF Printing:
Versatility: Works on cotton, polyester, and blends. Durability: Prints are resistant to cracking and fading. Ease of Use: Simple application process without extensive equipment.
Why should you consider Visit this page DTF? Well, if you want high-quality prints without breaking the bank or spending hours on setup, this might just be the route for you!
Understanding Gang Sheet DTF Transfers
So what exactly is a gang sheet? It's essentially a large sheet that contains multiple designs printed together for efficiency. Instead of wasting space on individual sheets, gang sheets optimize every inch by grouping designs—making them ideal for both small and large runs.
Benefits of Gang Sheets Cost-Effective: Reduces material waste. Time-Saving: Less time spent on setup means more production. Creative Freedom: Allows designers to experiment with multiple designs in one go.
When you're aiming to maximize efficiency in your operations, gang sheet DTF transfers should be at the top of your list!
The Process of Creating Gang Sheet DTF Transfers
Creating custom gang sheets isn’t as daunting as it sounds! Here’s a simple breakdown:
youtube
Step 1: Design Creation
Start by creating your digital artwork using design software like Adobe Illustrator or CorelDRAW. Make sure each design fits well within its designated area on the sheet.
Step 2: Print Setup
Load your film into a direct-to-film printer (the best DTF printer will make this step smoother). Adjust settings based on the material you’re using.

Step 3: Print
Print all designs onto the transfer film simultaneously! This is where you'll appreciate how much time you're saving.
Step 4: Apply Powder Adhesive
Sprinkle adhesive powder while the ink is still wet on your prints.
Step 5: Cure
Heat cure your prints using a heat press or oven until fully adhered.
Choosing the Right Equipment for DTF Printing
If you want to ensure quality results with minimal fuss, investing in reliable equipment is crucial. Here are some must-haves:
| Equipment | Description | |-------------------------|---------------------------------
2 notes
·
View notes
Text
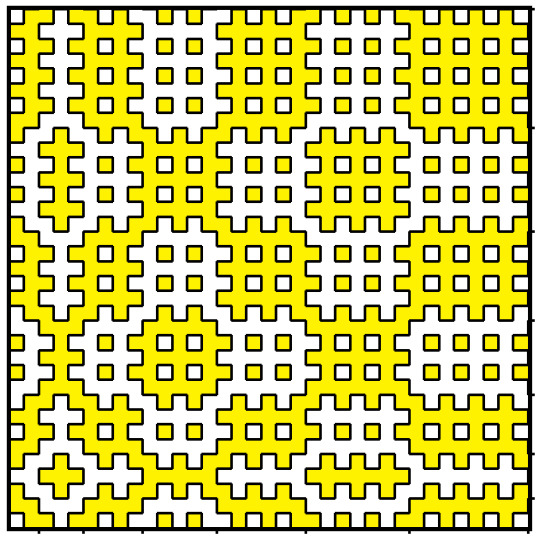

Hitomezashi Stitch Patterns
When I was a little boy I was never very good at colouring in between the lines and was very jealous of the girls in my class who did it beautifully and apparently effortlessly.
Even now and as someone who regards themselves as a process led artist I try to avoid colouring things in, but a few days ago I was watching a Numberphile video on YouTube, and it was about Hitomezashi stitch patterns and how they are generated.
Hitomezashi Stitch Patterns - Numberphile (youtube.com)
You find a rule that results in a binary string, so you might for instance choose a piece of text and if a letter is a consonant record a zero and if a vowel record a one, or a number if a digit is odd a zero if even a one. You then use this string to decide if a row or column of stitches starts with a stitch showing or hidden on the other side of the fabric. If just drawing patterns then you leave a space or start with a line.
Traditionally the stitches are done at right angles but in the video the demonstrator also introduces a triangular version, which complicates the pattern somewhat.
I admit to having cheated, the patterns were generated in CorelDraw and then coloured in Paint, the first pattern is coloured to show that such patterns are two colourable. The others follow no colouring rule other than my own garish taste.
This has been an entertaining way to spend some time over Easter but before I leave it I think I will try the sides of some different polygons.
5 notes
·
View notes
Text
How to Print a Digital Download from Etsy
The whole downloaded-file-to-framed-print-on-your-wall process breaks down like this:
- Save the file you purchased to your computer or thumbdrive.
- Take the file to a job printer and get it printed to the size you want.
- Take the printed file to a framer, and have it framed so it fits your décor.
Digital files are often much, much cheaper on Etsy than buying their physical item counterparts. Plus, when you buy a digital file, you can finetune it to the exact size you want for your own wall. And once it’s printed, you can also choose the exact framing and matting combination you want.
Now, the details:
You were on Etsy or an artist’s website, and you fell in love with an image. Perfect for your wall, but you’re not sure how the whole printing thing works.
Not to worry! Lots of people use printable downloads every day for party decorations, invites, or coloring pages for kids (using their own home printer, if they have one), or for higher quality prestige printing for smashing wall art. The following is a list of steps for accessing your digital downloads, and how to turn them into art you’ll be proud to see on your wall.
So, what’s a digital download, or ‘printable’? It’s not a physical object; it’s an image file, in the form of 1s and 0s, saved on your computer or a thumbdrive. You bought it, you keep it, and you can always print it, as many times as you like. You can copy the file to two or three locations, so you don’t lose it.
Digital downloads come in various formats, including PDF, JPG, PNG, SVG, EPS, and more. Each type of file depends on what you need to use it for and how you are going to print it. Printing services will specify which formats they need.
Etsy places the file to your account in the orders section and you can download it on a desktop. They’ll also send you an email with a link to it.
Or, log into your account and click on “Purchases and Reviews.” Find the button that says “Download Files”. If you run into troubles, there’s a Help page. (Remember, you can’t access your digital download file through the mobile Etsy app.)
Now that it’s downloaded, you can open your file, just to check whether you have the right image at the right size. You’ll need to use the right software.
.bmp (Microsoft Windows Photos, Apple Preview or Apple Photos, Adobe Photoshop, Adobe Illustrator, CorelDRAW)
.doc (Microsoft Word)
.gif (Microsoft Windows Photos, Apple Preview or Apple Photos, Adobe Photoshop, Adobe Illustrator, CorelDRAW)
.jpeg (Microsoft Windows Photos, Apple Preview or Apple Photos, Adobe Photoshop, Adobe Illustrator, CorelDRAW)
.jpg (Microsoft Windows Photos, Apple Preview or Apple Photos, Adobe Photoshop, Adobe Illustrator, CorelDRAW)
.mobi (Calibre, Stanza, Sumatra PDF, Mobi File Reader, popular eReaders)
.mov (QuickTime, iTunes)
.mp3 (Windows Media Player or iTunes)
.mpeg (Windows Media Player, QuickTime)
.pdf (Adobe Acrobat Reader, Most Internet Browsers)
.png (Microsoft Windows Photos, Apple Preview or Apple Photos, Adobe Photoshop, Adobe Illustrator, CorelDRAW)
.psp (Corel PaintShop Pro, Adobe Photoshop, ACD Systems Canvas)
.rtf (Microsoft Word, WordPad)
.stl (AutoDesk Viewer, Microsoft 3D Viewer, Microsoft Print 3D, ShareCAD)
.txt (Windows NotePad, TextEdit on Mac)
.zip (Usually, you can unzip a .zip file with any computer.)
.ePUB (Various eReaders)
.iBook (Internet browser or Apple iBooks)
You can print image files on home printers. This is great for low-resolution art up to 8.5” x 11”, like recipes, or sewing instructions. The downside here is that the print will only be as good as the printer itself. For larger wall art, the best move is to take your file to a professional printshop.
This can be done online, or it can be done in person. Local Walgreens and Costcos are often quite good. You can upload your saved image file to them using their official website, and just pick up your image, printed the size you specify, on the paper you choose, the next time you’re in the neighborhood. There are also online choices like Shutterfly or Vistaprint, who will ship you your prints in the mail.
You’ve got your print, and you love it. But it’s just a big piece of paper right now; what about framing? One easy option is to select a standard sized frame, mat and glass available at the local stores or mall shops, and insert your new print yourself. Or maybe your print deserves first-cabin treatment, and you’ll want to check out the local frame shop for the right frame, matting and glass. Either way, totally legit. Then just hang it on the wall, and enjoy.
And that’s the whole process. Before you buy a digital download, you should check a couple of things:
- Be sure you have the software you’ll need to open the download at home, or be sure you know where online to find a site that will open the image (such as Photopea.com, for opening a layered .psd file, if you don’t happen to have Photoshop on your own machine).
- Be sure you understand the optimum print size of the download and its aspect ratio. Artists generally will inform you that their image will look best at a certain size, say, 24” x 18”. Printing it larger will seem overblown, with visible pixellation; printing it smaller will cause it to lose detail.
In other words, make sure the digital download fits your needs before you buy.
+++++++++++++
#collage#abstract#art#modernart#digital download#etsy#midcentury#kolaj#homedecor#interiordesign#design
4 notes
·
View notes
Text
Best Fashion Designing Course Bangalore | Eduleem Institute

Are you dreaming of a creative career in fashion? Do you want to learn how to design clothes, understand styles, and work in the fashion industry? Then it's time to join the Fashion Designing Course in Bangalore at Eduleem Institute.
At Eduleem, you will learn everything about fashion from sketching to sewing, from fabrics to styling in a simple and practical way. Whether you're a student or someone looking for a career change, this course can help you follow your passion.
Why Choose a Fashion Design Course in Bangalore?
Bangalore is not just a tech hub. It’s also a growing place for fashion, design, and creativity. Many fashion shows, design studios, and clothing brands are opening up here.
Doing a fashion designing course in Bangalore gives you a great opportunity to learn and find work in the same city. The city offers:
A vibrant fashion community
Internships and job options
Exposure to fashion events and exhibitions
Why Eduleem Offers the Best Fashion Designing Course in Bangalore
Eduleem is one of the best places to study fashion design. The course is made for beginners and also suits those who already have a little experience. What makes Eduleem special is its 100% practical training and career support.
Highlights of the Fashion Designing Course:
Easy-to-understand lessons
Experienced and friendly trainers
Hands-on classes with real materials
Sketching, garment construction, pattern making
Fashion illustration and styling
Fashion software training (like Adobe Illustrator & CAD tools)
Personal attention in small batches
Internship support and job placement guidance
You won’t just study from books. At Eduleem, you will create real outfits, develop your own style, and build a strong fashion portfolio.
What You Will Learn in This Fashion Designing Course
The Fashion design course in Bangalore by Eduleem covers every important topic to help you grow as a designer. Here’s what you will learn:
Foundation Modules:
Introduction to Fashion and Design
Drawing, Sketching, and Colour Theory
Types of Fabrics and Their Use
Core Designing Skills:
Pattern Making and Draping
Cutting and Stitching Techniques
Garment Construction
Fashion Software Skills:
Digital Fashion Sketching
Adobe Illustrator and CorelDRAW
Fashion Portfolio Making
Business & Styling:
Fashion Marketing and Merchandising
Styling for Photoshoots and Events
How to Start Your Own Fashion Brand
You will also take part in workshops, exhibitions, and mini fashion shows, so your learning is fun and creative.
Who Can Join the Course?
This fashion designing course Bangalore is open to everyone:
School or college students
Fashion lovers and hobbyists
Housewives or working professionals
Anyone looking for a creative career
You don’t need to know how to sew or draw perfectly. The course starts from basics and teaches you everything step by step.
Duration and Batch Options
Eduleem offers flexible course options so that you can choose what suits your time and goals:
6-month Professional Program
1-year Diploma Program
18-month International Program
You can choose between weekday and weekend classes, and even attend a free demo session before enrolling.
Career Options After This Fashion Designing Course
Once you finish the course, you can work in many exciting roles such as:
Fashion Designer
Fashion Illustrator
Stylist
Boutique Owner
Visual Merchandiser
Fashion Blogger
Costume Designer for films and TV
Fashion Entrepreneur
Eduleem helps you prepare for interviews, build your resume, and even supports you with internship and placement opportunities.
What Makes Eduleem the Best Fashion Design Institute in Bangalore?
Here’s why students trust Eduleem:
Updated syllabus based on industry needs
Practical learning environment
Trainers from top design backgrounds
In-house projects and portfolio support
Placement support in top fashion companies
Affordable fees with EMI options
Students at Eduleem don’t just learn fashion. They become confident, creative professionals ready to enter the fashion industry.
Enroll Today and Start Your Fashion Career
If fashion is your dream, don’t wait. Join the Fashion Designing Course in Bangalore at Eduleem Institute and take your first step towards a bright future in the fashion world.
Eduleem is ready to guide you, teach you, and help you grow as a designer.
0 notes
Text
The Science and Art Behind Acrylic Laser Engraving
Acrylic is one of the most versatile and visually appealing materials used in signage, displays, décor, and branding. When you want to add a personal, professional, or artistic touch to acrylic items, acrylic engraving services offer the perfect solution. This process allows you to create permanent marks, texts, and designs with incredible precision and durability.

Let’s explore what acrylic engraving is, how it’s done—especially with laser engraving—and why it’s widely used in various industries today.
What Is Acrylic Engraving?
Acrylic engraving is the process of etching or marking the surface of an acrylic sheet using tools or lasers to create a design. The engraved area appears frosted or white, giving a sharp contrast against the glossy surface of the acrylic.
Engraving is typically used for:
Logos and brand names
Personalized gifts or awards
Interior and exterior signs
Labels, panels, and nameplates
Decorative art and motifs
The finish is elegant, permanent, and visually striking—making engraved acrylic a preferred choice for high-end applications.
Why Choose Engraving for Acrylic?
Precision and Detail
Laser technology allows for highly detailed and intricate designs, including small text, complex logos, and decorative patterns.
Clean and Polished Finish
Unlike mechanical engraving, laser engraving leaves no physical contact marks. The result is a neat, frosted finish that enhances readability and aesthetics.
Speed and Efficiency
Engraving is fast and consistent, making it ideal for both single and bulk orders.
Customizability
You can easily modify designs digitally and apply them directly to acrylic surfaces using laser systems. This makes it perfect for customized products.
Types of Acrylic Suitable for Engraving
There are two main types of acrylic materials used in engraving:
Cast Acrylic: Best suited for laser engraving as it gives a smooth, frosted finish.
Extruded Acrylic: Tends to melt or warp under lasers, better suited for cutting than engraving.
For professional engraving services, cast acrylic is the preferred material due to its superior engraving response.
Applications of Acrylic Engraving Services
Laser-engraved acrylic is used in a wide variety of industries, including:
Retail & Corporate: Signboards, product displays, promotional materials
Events & Hospitality: Custom awards, trophies, table signs, and menu holders
Architecture & Interiors: Decorative panels, wall art, door nameplates
Personalized Gifts: Photo frames, keepsakes, wedding signage
The versatility and elegance of engraved acrylic make it a go-to material for both decorative and functional purposes.
How Is Acrylic Engraving Done?
Here’s a step-by-step overview of the process:
Design Creation: The design is created digitally using software like CorelDRAW or Adobe Illustrator.
Material Selection: Cast acrylic of appropriate thickness and size is chosen.
Machine Setup: The engraving machine is configured for power, speed, and focus based on the material.
Engraving Execution: The design is uploaded to the laser machine, which then etches it onto the surface with pinpoint accuracy.
Finishing Touches: The engraved item is cleaned and polished for final presentation.
Also Read : Top Quality Solutions from Acrylic Signage Suppliers Dubai: Helping Businesses Stand Out
In Conclusion
Acrylic engraving is an ideal way to create long-lasting, visually appealing designs on a modern, versatile material. Whether you need corporate signage, personalized décor, or artistic creations, engraving services using laser engraving offer unmatched precision and beauty.
For expertly crafted acrylic engravings with a flawless finish, choose Pleasant Plastic—your trusted partner in premium acrylic solutions.
0 notes
Text
The Lifecycle of a Patent Drawing: From Concept to Filing
Patent drawings are an indispensable part of a successful patent application. Whether you’re applying for a utility patent to protect functionality or a design patent to protect appearance, drawings help communicate your invention in a way that words alone cannot. But what’s the journey like from initial concept to the final version that’s submitted to a patent office?
In this article, we’ll walk through the complete lifecycle of a patent drawing, from the first sketch to the final, legally compliant illustration that supports your patent claim.
1. Conceptualising the Invention
Every patent drawing begins with a core idea: the invention itself. This is the stage where inventors:
Define the invention’s purpose and functionality
Identify its unique elements
Consider how to visually represent these features
At this point, inventors might use rough hand-drawn sketches, photos of prototypes, or digital mockups. These early visuals serve as a blueprint for the professional drafts that follow.
2. Gathering Reference Materials
Before engaging a patent drawing service, inventors or patent attorneys compile all necessary reference materials, such as:
Hand sketches or digital renderings
Engineering diagrams or CAD files
Product photos or 3D models
Notes about key features or moving parts
The more detailed and organised this material is, the more accurate and efficient the drawing process will be.
3. Choosing the Right Drawing Type
There are two major types of patent drawings, and the process varies slightly depending on the one you’re preparing:
Utility Patent Drawings: These focus on how the invention works. Views often include cutaways, cross-sections, and exploded diagrams.
Design Patent Drawings: These focus on how the invention looks. Multiple perspective views (top, bottom, front, rear, left, right, and isometric) are typically required.
Determining which type you're filing for helps define the visual approach, level of detail, and drawing style needed.
4. Hiring a Professional Patent Drawing Service
While some inventors attempt to create patent drawings themselves, most rely on professionals for a few good reasons:
Compliance with USPTO, EPO, or WIPO guidelines
Technical drawing expertise
Knowledge of required line weights, margins, labelling, and formatting
Professional illustrators use software such as AutoCAD, Adobe Illustrator, SolidWorks, or CorelDRAW to produce high-precision, legally compliant drawings.
5. Drafting the Initial Illustrations
The first formal version of the patent drawing is created based on the materials provided and in consultation with the inventor or patent attorney. This initial draft typically includes:
All required views (perspective, sectional, exploded, etc.)
Annotations or labels as needed
Appropriate line styles (solid, dashed, broken) to represent different features
This stage focuses on accuracy and completeness, with the goal of visually representing the invention in its entirety.
6. Review and Revisions
After the initial drawings are delivered, the inventor or attorney reviews them carefully to:
Ensure all features are represented correctly
Check compliance with patent office requirements
Request revisions or additional views if needed
Most professional services offer at least one or two free revision rounds. This collaborative phase ensures that the drawing effectively supports the written claims and specification.
7. Finalisation and Formatting
Once approved, the drawings are finalised. This step involves:
Applying consistent line thickness and shading
Adding proper figure numbers and labels
Ensuring spacing, margins, and dimensions meet submission standards
Exporting in correct formats (e.g., PDF, TIFF, DWG)
At this stage, the drawing is ready for submission and is often integrated into the patent application package by the patent attorney.
8. Submission with the Patent Application
The completed patent drawings are submitted alongside the patent specification and claims to the relevant patent office. Depending on the jurisdiction, the drawings must:
Be printed on specific paper sizes (like A4 or letter)
Include identification data (inventor name, application number)
Be in black and white, unless colour is explicitly requested and justified
Compliance at this stage is crucial; non-compliant drawings can lead to office actions, delays, or outright rejection.
9. Post-Filing Updates or Revisions (If Needed)
Sometimes, the patent examiner may request changes or clarifications after reviewing the application. This may include:
Adding new views
Correcting labelling errors
Enhancing clarity or removing unnecessary details
In such cases, updated drawings must be submitted promptly and in the same compliant format.
In a Nutshell
The lifecycle of a patent drawing is a structured, collaborative, and highly technical process. What starts as a rough sketch or idea must be transformed into a professional, legally acceptable illustration that supports the core of your patent claims.
Understanding this process ensures fewer delays, better compliance, and a stronger patent application for first-time inventors and seasoned professionals alike. Investing in high-quality patent drawing services can make all the difference between rejection and protection.
0 notes
Text
Argentina 50 Años Jersey Font – Celebrate a Legacy in Style

Celebrate the golden legacy of Argentine football with the exclusive Argentina 50 Años Jersey Font – a tribute to the nation’s rich history and its collaboration with Adidas. Perfect for custom jerseys, Cricut projects, or football-themed gifts, this font echoes the design of Argentina's 50th Anniversary Kit and honors their 1978 World Cup win.
👉 Get the Argentina 50 Años Jersey Font on Etsy
🏆 Adidas x Argentina 50th Anniversary Kit – On-Pitch Tribute
Kit Release & Debut: Adidas released the Argentina 50th Anniversary Kit on November 14th, 2024, and the national team debuted it during a match against Peru on November 19th.
Design & Features: The kit blends classic white and light blue stripes with gold details, including the Adidas Trefoil logo and AFA lettering. It features a special collar graphic, black and gold shorts, and matching socks. The look is both modern and nostalgic.
Historical Significance: This is Argentina’s first-ever anniversary kit, celebrating 50 years of partnership with Adidas, which began in 1974. Though Argentina worked with other brands like Le Coq Sportif in the past, the Adidas connection was renewed in 2001 and remains iconic today.
Color Palette:
Main color: Ambient Sky
Gold accents for the Trefoil, AFA, and laurel wreath
3 stars symbolizing Argentina’s World Cup wins
🎨 What You’ll Get – Argentina 50 Años Font
This font is inspired by the unique number and name styling seen in the anniversary kit. You’ll receive:

✅ OTF & TTF files for easy installation
✅ Complete A–Z and 0–9 set
✅ Retro feel blended with modern block design
✅ High-resolution quality for vinyl and fabric use
👉 Get the Argentina 50 Años Jersey Font on Etsy
🖨️ How to Customize Your Jersey
Whether you're a collector or a fan who loves to wear your pride, you can apply this font to your own kit using:
Install the font on your computer
Open your software (like Canva, Illustrator, Cricut)
Create your name + number using this font
Export it for print
Use HTV or DTF printing with a heat press for best results

🛠️ 5 Best Tools for Using Football Jersey Fonts
To create your custom designs professionally, try:
Canva – Quick and easy mockups
Cricut Design Space – For vinyl cutting and layout
Adobe Illustrator – Vector editing and pro design
CorelDRAW – Great for large-format printing
Inkscape – A free alternative for SVG editing

youtube
🛍️ Why Buy from Etsy?
Our fonts are listed on Etsy, a safe and trusted marketplace for creatives. With instant download and secure checkout, Etsy gives you:
🔐 Trusted payments
📥 Immediate access to your files
✉️ Easy communication and support
🌍 Global accessibility
👉 Get the Argentina 50 Años Jersey Font on Etsy
❓ Frequently Asked Questions (FAQ)
Can I use this font with Cricut or Silhouette? Yes – the SVG and vector files are fully compatible.
Is this an official AFA font? No. This is a fan-made recreation inspired by the 50 Años kit for personal use.
Can I sell jerseys made with this font? The font is for personal use only. Contact us if you need a commercial license.
What formats are included? You’ll get OTF, TTF, SVG, AI, EPS files in a zip download.
How do I install the font? Just double-click the OTF or TTF file and click "Install" on your Mac or PC.
—
Unlocking the Style: The Significance of the 🇦🇷 Argentina 50 Años Jersey Font
The Historical Context of the 🇦🇷 Argentina 50 Años Jersey
Argentina football history, 50 years celebration, soccer jersey design, iconic sportswear
The Design Elements that Make the 🇦🇷 Argentina 50 Años Jersey Font Unique
jersey typography, font design in sportswear, visual identity, branding in jerseys
Why the Right Font Matters in Sports Jerseys: A Look at Impact and Recognition
sports branding, jersey recognition, fan engagement through design, typography importance in sports
The Influence of Typography on Team Spirit and Fan Culture
fan loyalty symbols, cultural significance of fonts, community identity through jerseys
A Closer Look at How to Acquire Your Own 🇦🇷 Argentina 50 Años Jersey Font Design
where to buy jerseys online, custom jersey options, limited edition sportswear availability
Conclusion: Celebrate Argentine Football Legacy with the Iconic 50 Años Jersey Font Today!
👉 Get the Argentina 50 Años Jersey Font on Etsy
Unlock the Nostalgia: Discover the Argentina 50 Años Jersey Font
Introduction: The Significance of the Argentina 50 Años Jersey
Argentina football history, commemorative jersey, sports design, football culture, jersey typography
The Unique Style of the Argentina 50 Años Jersey Font
jersey font design, typography in sports, unique athletic fonts, visual identity, custom jersey fonts
How to Incorporate the Argentina 50 Años Jersey Font into Your Designs
graphic design tips, sports branding, using jersey fonts in projects, personalizing jerseys, font applications
The Legacy of Argentina's Football Achievements Celebrated Through Design
football achievements history, Argentine football legends, cultural impact of sports jerseys, iconic designs in football history
Where to Find and Download the Argentina 50 Años Jersey Font for Your Projects
font download sources, free font resources for designers, where to buy jersey fonts online, creative marketplace options for fonts
Conclusion: Celebrate Argentine Football History by Using the Iconic 50 Años Jersey Font Today!
👉 Get the Argentina 50 Años Jersey Font on Etsy
#argentina#Argentina 50 Años#messi font#messi custom#leo messi#Messi jersey#world cup#world cup 2026#font#font design#fonts#fonts & typography#football#football jerseys#football numbers#jersey#soccer font#soccer#Soccer ttf#Soccer otf#Custom jersey#Youtube
4 notes
·
View notes
Text
Learn Creative Graphic Design course at The Skill Boost
Develop Your Creativity by Enrolling in a Graphic Design Course in Chandigarh at The Skill Boost Computer Institute.
In today's visually driven world, graphic design has become one of the most vital tools for communication, branding, and storytelling. From digital marketing to product packaging, every visual element we see has likely been touched by a graphic designer. For individuals who want to master this powerful skill set, the Graphic Design Course in Chandigarh at The Skill Boost Computer Institute in Chandigarh offers a comprehensive, industry-oriented learning path that turns passion into profession.
Why Graphic Design?
Graphic design blends creativity with strategy. It's about efficiently conveying a message, not just about making things appear attractive. Whether you're creating a brand identity, a website interface, social media content, or a marketing brochure, design plays a central role in influencing perception and decision-making.
As businesses go digital, the demand for skilled designers is rapidly increasing. A strong foundation in graphic design can lead to exciting careers as a Graphic Designer, UI/UX Designer, Visual Artist, Creative Director, Illustrator, or Brand Consultant—whether in an agency setting, corporate environment, or as a freelancer.
About the Course at The Skill Boost Computer Institute
Located in the heart of Chandigarh, The Skill Boost Computer Institute has built a strong reputation for delivering hands-on, career-focused education in digital skills. Their Graphic Designing Course is a carefully structured program aimed at beginners, students, job seekers, and professionals looking to upgrade their skills.
The course goes far beyond basic design. It introduces students to the fundamental principles of visual communication, while also offering mastery over industry-standard tools and real-time project experience.
What You Will Learn
Design Theory & Principles
Fundamentals of visual design: balance, contrast, hierarchy, alignment, space, and proportion
Importance of visual storytelling and composition
Creative thinking and concept development
Typography
Understanding fonts, spacing, kerning, and readability
Creative use of type in design and branding
Color Psychology & Harmony
Learn how colors influence emotions and decisions
Apply color schemes effectively in various design contexts
Practical Software Skills Gain hands-on experience with:
Adobe Photoshop – Image editing and manipulation
Adobe Illustrator – Logo design, vector art
Adobe XD / Figma – Interface design and prototyping
CorelDRAW & InDesign – Print media and layout design
Portfolio Development
Design logos, brochures, web interfaces, posters, social media ads, product packaging, and more
Build a professional portfolio that showcases your creativity and technical expertise
Career Support & Certification
This course's career-focused approach is one of its most notable aspects. Upon completion, students receive a professional certification from The Skill Boost Computer Institute, validating their skills for employers and clients. The institute also offers placement assistance, career counseling, and freelancing guidance to help students navigate the competitive job market.
Whether you're aiming to land a job in a design agency or planning to start your own freelance journey, this course gives you the confidence and capability to succeed.
Who Can Join?
Students seeking a creative and in-demand career path
Graduates exploring digital and design industries
Marketing professionals wanting to expand their skill set
Entrepreneurs and freelancers who want to produce their own graphics
Anyone who has a love for design—no prior knowledge is necessary
Why Choose The Skill Boost Computer Institute?
Experienced trainers with real industry exposure
Practical, project-based learning
Affordable course fees
Flexible batch timings (including weekends)
Fully equipped labs and a creative learning environment
Ready to Start Your Creative Journey?
The Graphic Design Course in Chandigarh at The Skill Boost Computer Institute, is more than just a training program—it’s a launchpad for your creative career. With a perfect blend of theory, tools, and real-world projects, this course transforms your passion for design into a professional skill set.
To enroll or learn more, visit The Skill Boost Computer Institute’s official website or contact their admissions team today.
#GraphicDesignChandigarh#TheSkillBoost#DesignCourseChandigarh#LearnGraphicDesign#GraphicDesignTraining#SkillBoostChandigarh#ChandigarhDesignInstitute#CreativeSkillsChandigarh#GraphicDesignIndia#DesignYourFuture
1 note
·
View note
Text
Checker Flower - Coloring Page
The Checker Flower coloring page has a lot of potential to be beautiful. You are welcome to download it from the link or my Coloring Page. Color it! Or, use it as a template for a tangle. I created this coloring page using CorelDraw and here are some examples of how I colored it. Checker Flower: Checker Flower: With Awesome Background. The shading really brings out the flower. Checker Flower:…
0 notes
Text
The Rising Demand for Certificate Courses: Your Pathway to Career Excellence
In the ever-evolving world of employment, upskilling has become more than a personal goal—it's a necessity. Whether you're a recent graduate looking to gain practical knowledge, a working professional aiming to specialize in a new domain, or someone wanting to re-enter the workforce with competitive skills, certificate courses offer a flexible and effective solution. These programs, particularly when pursued in cities like Chandigarh—a growing education and IT hub—can be the key to unlocking high-growth career paths.
This blog explores why certificate courses are becoming increasingly important, the kinds of programs available, and how Certificate Training in Chandigarh can give you a significant edge in your professional journey.
What Are Certificate Courses?
Certificate courses are short-term educational programs designed to provide individuals with specific skills in a focused area. These programs are typically more career-oriented than traditional academic degrees and are often used to develop expertise in a particular field, update existing knowledge, or gain industry-relevant training.
Unlike longer diploma or degree programs, certificate courses focus on hands-on skills, industry trends, and practical applications. They are often available in areas like digital marketing, web development, accounting software (like Tally or QuickBooks), graphic designing, ethical hacking, spoken English, and more.
Why Choose Certificate Courses?
Quick Learning and Fast Results Most certificate programs range from a few weeks to a few months. This means you can acquire new skills quickly and start applying them immediately.
Cost-Effective These programs are generally affordable compared to full-time degree programs. This makes them a practical choice for students and working professionals alike.
Skill Enhancement They are perfect for those who want to upgrade their skills without committing years to education.
Career Shift or Boost Certificate courses are ideal for individuals looking to change careers or get promoted within their current job by demonstrating enhanced qualifications.
Chandigarh – An Emerging Hub for Career-Oriented Training
Chandigarh is more than just a beautiful city with great infrastructure. It has grown into an educational and IT nucleus, attracting thousands of students and professionals every year. With numerous reputed institutions, affordable living, and excellent connectivity, Chandigarh offers the perfect environment for learners to grow and evolve.

Who Should Enroll in Certificate Training?
Students looking to gain industry-relevant skills to boost employability
Working professionals aiming to transition into higher roles or new industries
Entrepreneurs wanting to enhance their operational or marketing knowledge
Job seekers needing a boost to their resume to stand out in a competitive job market
Freelancers looking to validate their skills through certifications
Popular Certificate Courses in Chandigarh
There are several Certificate Courses in Chandigarh catering to various domains and industries. Some of the most popular include:
Digital Marketing: Covers SEO, SEM, PPC, social media marketing, content creation, and analytics.
Web Designing and Development: Focuses on HTML, CSS, JavaScript, PHP, CMS platforms, and UI/UX.
Tally and GST Training: Highly useful for commerce students and accounting professionals.
Graphic Designing: Learn tools like Adobe Photoshop, Illustrator, CorelDraw, and InDesign.
Spoken English & Personality Development: For better communication, confidence building, and public speaking.
Ethical Hacking & Cyber Security: For IT professionals looking to specialize in security.
Python & Data Science: With growing demand for data professionals, these technical courses are in high demand.
Industry-Relevant Curriculum
One of the most important aspects of certificate training is its alignment with industry needs. These programs are often designed in collaboration with industry experts to ensure that learners gain relevant, updated, and applicable knowledge.
Institutions offering Certificate Training in Chandigarh often revise their curriculum regularly to incorporate the latest technologies, software updates, and market trends. This dynamic structure makes the learning process more practical and beneficial.
Flexible Learning Options
Another benefit is flexibility. Many institutions offer both offline and online modes of training. This enables learners to pick formats that best suit their lifestyle—whether that means weekend batches, evening classes, or online modules for remote learning.
Working professionals especially benefit from such flexible schedules, which allow them to upskill without compromising their current employment.
Certification and Career Support
One of the main advantages of enrolling in Certificate Courses is the formal recognition they offer. Upon completion, learners receive a certificate that validates their skills and adds value to their resume.
In Chandigarh, many institutes go the extra mile by offering career support services such as:
Resume writing and interview preparation
Internship opportunities
Placement assistance with local and national companies
Hands-on project work and case studies
The Role of Certificate Courses in a Changing Job Market
Today’s job market is fiercely competitive and constantly evolving. Traditional education alone often doesn’t meet the demands of employers looking for specific skills and practical knowledge. Certificate courses bridge this gap by offering fast, focused, and functional learning.
Moreover, with the rise of automation and digital transformation, many traditional roles are becoming obsolete while new ones emerge. To stay relevant, professionals must continuously reskill and upskill—exactly what certificate training enables them to do.
Success Stories: How Certificate Courses Transformed Careers
Take the example of Riya Sharma, a B.Com graduate who struggled to find a job for over a year. After completing a certificate course in Tally and GST from a reputed Chandigarh institute, she landed an accounts executive position within two months.
Or consider Arjun, a graphic designer with five years of experience. A specialized certificate course in UI/UX design helped him switch from freelancing to a full-time position with a top design firm.
These stories are not rare. Every year, hundreds of learners upgrade their skills and successfully pivot their careers with the help of certificate training.
Choosing the Right Institute
Before enrolling, it's important to evaluate the credibility of the training institute. Look for:
Experienced faculty with industry background
Updated curriculum with hands-on training
Placement support and career counseling
Student reviews and alumni testimonials
Certification validity and industry recognition
Final Thoughts
In a world where the value of practical, job-ready skills is growing by the day, certificate courses offer a powerful route to success. Whether you're just starting out or looking to climb the corporate ladder, these programs can sharpen your skills, build your confidence, and broaden your career opportunities.
Cities like Chandigarh offer a vibrant ecosystem for such learning, blending quality education with supportive infrastructure and a growing job market.
So why wait? Invest in yourself today. Choose a certificate program that aligns with your goals, and take the next step toward a brighter, more skilled, and future-ready you.
0 notes
Text
Unlock the Beauty of Indian Scripts with Devnagri Fonts: A Complete Guide for Designers and Creators
Introduction to Devnagri Fonts
Have you ever looked at a beautifully designed Hindi poster and wondered how the fonts look so crisp and culturally rich? That’s the magic of Devnagri Fonts. These fonts, based on the Devnagri script, help bring Indian languages to life in digital and print designs. Whether you're a web designer, a content creator, or just someone who loves experimenting with typography, Devnagri fonts are your ticket to designing with tradition and flair.
Why Devnagri Fonts Matter in Modern Design
Cultural Relevance and Identity
In a world where design often leans toward Western fonts and English-centric visuals, Devnagri fonts play a huge role in preserving cultural identity. They give regional languages a voice and style, bridging tradition and technology.
Growing Use in Digital Media
With India being one of the largest digital markets, regional content is booming. From YouTube thumbnails to wedding invitations, Devnagri fonts are everywhere. Their demand is growing, especially in apps, social media posts, and localized branding.
What is the Devnagri Script?
Languages That Use Devnagri Script
The Devnagri script is used in multiple Indian languages such as Hindi, Marathi, Nepali, Sanskrit, and Konkani. It's one of the most widely adopted scripts in the Indian subcontinent.
Brief History of Devnagri Script
The roots of Devnagri date back to the 7th century AD, and it evolved from the Brahmi script. Over centuries, it became a cornerstone of Indian literature and spirituality. Today, it powers not just holy scriptures but also modern memes!
Popular Uses of Devnagri Fonts
Web Design and UI Projects
From educational platforms to e-commerce sites targeting Indian users, Devnagri fonts make content accessible and relatable. UX designers now often include Hindi font support in bilingual websites.
Print Media and Branding
Flyers, banners, and brochures targeted at regional audiences rely heavily on bold, legible Devnagri fonts. They create instant emotional connections.
Social Media Graphics and Videos
Want your Instagram reel title to pop in Hindi? Devnagri fonts let you blend authenticity with aesthetics. Influencers and marketers are using these fonts to speak directly to their niche audiences.
How to Use Devnagri Fonts Effectively
Choosing the Right Font for the Right Project
Don’t just pick the fanciest font. Consider your audience, platform, and purpose. For body text, choose simpler fonts. For headers, go bold.
Combining Devnagri Fonts with English Text
Mixing Devnagri with Latin scripts? Make sure both fonts visually complement each other. Contrast is good, but clashes aren’t.
Maintaining Readability and Aesthetics
Avoid using overly ornamental fonts in small sizes. Spacing and alignment can make or break your design.
Where to Download Devnagri Fonts for Free?
Why Choose FreeFontDownload
FreeFontDownload offers a wide collection of Devnagri fonts that are:
100% Free for personal and commercial use
Available in multiple styles and weights
Easy to preview before downloading
Regularly updated
Tips for Designers Using Devnagri Fonts
Mind the Spacing and Line Height
Devnagri characters can appear dense. Increase line spacing slightly to improve readability.
Test on Multiple Devices
What looks good on a laptop might appear squished on a mobile screen. Always check across platforms.
Always Embed Fonts in Documents
If you’re sending a file to someone, make sure the fonts are embedded so it looks exactly as intended.
Common Challenges When Using Devnagri Fonts
Rendering Issues on Some Devices
Older software or browsers may not render certain fonts properly. Stick to Unicode fonts like Mangal when in doubt.
Font Compatibility with Software
Devnagri fonts may not be compatible with every design tool. Tools like Adobe Illustrator and CorelDRAW usually support them, but always test.
Conclusion
Designing with Devnagri fonts isn't just about pretty letters—it's about telling stories, connecting with cultures, and crafting visuals that speak the language of your audience. Whether you're building a website or designing a wedding invite, Devnagri fonts can give your work the local flavor it deserves. And the best part? You can find a treasure trove of them on FreeFontDownload—ready to use, forever free!
0 notes
Text
GDI – Graphics Designing Course Institute, Chandigarh
In the fast-paced world of digital communication, graphic design is the backbone of visual storytelling. Whether it’s the logo of a global brand, the interface of your favorite app, or the social media posts that stop you mid-scroll, a graphic designer’s work is everywhere. Helping individuals harness this creative power into a meaningful career is GDI – Graphics Designing Course Institute, Chandigarh.
More than just an institute, GDI is a creative catalyst—a place where passion meets profession, where design transforms from a hobby into a high-impact career path.
Turning Creativity into Capability
Creativity without direction can remain potential. At GDI, raw talent is refined through structured guidance and expert mentorship. The institute offers a wide range of industry-relevant courses that give students both technical proficiency and design fluency.
Students don’t just learn how to use tools like Adobe Photoshop or Illustrator—they learn how to think like designers, how to solve visual problems, and how to meet real client expectations.
The curriculum is built to mirror the actual work environment of design agencies and digital firms. By the time students graduate, they are ready to hit the ground running.
Course Offerings Designed for the Future
Whether you're just beginning your design journey or looking to upgrade your skills, GDI has a course tailored for your needs:
🎓 1-Year Advanced Diploma in Graphic Design
Covers everything from visual theory and digital art to motion graphics, UI/UX, and branding. This is the flagship course for students looking to build a long-term career in design.
🚀 8-Month Graphic Expert Premium Program
A condensed, skills-focused track designed for fast learners or professionals switching careers. Emphasis is placed on core software mastery and portfolio development.
🧩 Short-Term Certification Courses
Courses ranging from 1 to 3 months in tools like Adobe XD, CorelDRAW, Canva, After Effects, or specific skills such as logo design, typography, or social media creatives.
Every course includes project work, assessments, feedback sessions, and real-world case studies.
Technology + Creativity = Career
In today’s digital-first economy, designers must be tech-savvy. That’s why GDI makes sure students are proficient in the latest tools:
Adobe Creative Suite (Photoshop, Illustrator, InDesign, After Effects, Premiere Pro)
Figma & Adobe XD for interface and user experience design
CorelDRAW & Canva for fast, efficient layout creation
Digital sketching and design workflows on tablets and hybrid platforms
With a strong technical foundation, students are empowered to work in any design environment—be it in-house, freelance, or agency.
Faculty That Shapes the Future
What truly sets GDI apart is its team of experienced mentors. Instructors aren’t just teachers—they’re working professionals who bring their industry knowledge directly into the classroom.
They guide students not just on design fundamentals but also on:
Real-world client interaction
Freelancing tips and client acquisition
Pricing and project management
Brand strategy and digital storytelling
The mentorship at GDI is personal, proactive, and purpose-driven. Students get regular feedback and one-on-one sessions to help refine their design identity and career goals.
Real Portfolios. Real Opportunities.
At the end of every course, students at GDI don’t walk away with just a certificate—they walk away with a professional-grade portfolio. These portfolios showcase work across multiple disciplines:
Branding and logo projects
UI/UX prototypes
Packaging and print design
Animated and video content
Social media campaigns
Portfolios are reviewed by instructors and sometimes even external designers to give students a realistic idea of their market readiness.
This focus on outcomes ensures that GDI students are interview-ready and freelance-ready.
Career Launchpad: Beyond the Classroom
GDI’s mission is not just to teach design but to launch creative careers. That’s why the institute offers a robust set of career support services:
Resume and portfolio review
LinkedIn and Behance optimization
Job referrals and placement assistance
Internship opportunities
Freelance and startup guidance
Students are taught how to present themselves, how to build a personal brand, and how to confidently pitch their services.
Many graduates go on to work with design studios, advertising agencies, digital marketing firms, and product startups. Others build successful freelance careers or even launch their own creative businesses.
Creative Culture and Community
At GDI, learning is immersive and interactive. The institute hosts:
Monthly design challenges
Portfolio day events
Guest lectures from industry leaders
Peer critiques and collaborative projects
This collaborative environment fosters not just creativity but confidence and communication skills—key traits in any designer’s success.
Chandigarh: The Perfect Creative Setting
GDI’s location in Chandigarh offers a perfect blend of inspiration and opportunity. The city’s reputation for planning and design influences the institute’s aesthetic focus. Plus, Chandigarh’s growing tech and startup ecosystem makes it a fertile ground for emerging designers to find work, network, and grow.
Conclusion: GDI Is More Than an Institute—It’s a Creative Journey
In a world dominated by digital visuals and constant content, the role of the designer is more crucial than ever. GDI understands this and equips students with everything they need to thrive in the creative industry.
From cutting-edge tools and expert mentorship to portfolio development and career coaching, GDI – Graphics Designing Course Institute, Chandigarh provides the complete package. It’s not just a place to learn—it’s where careers are built, brands are born, and designers discover their creative identity.
If you’re passionate about design and ready to transform your creativity into a profession, GDI is your starting point.
0 notes
Text
How to Make Utility Patent Drawings That Meet USPTO Standards | The Patent Experts
Creating accurate and USPTO-compliant utility patent drawings is essential to filing a successful utility patent application. These drawings are not just visual aids — they are legal documents that explain your invention in detail. Without proper illustrations, your application may be delayed, rejected, or misunderstood by the examiner.

This guide will walk you through everything you need to know about making utility patent drawings — from understanding USPTO requirements to choosing the right tools and avoiding common mistakes. We’ll also explore examples, FAQs, and real-life case studies to illustrate the process.
Why Are Utility Patent Drawings Important?
Utility patent drawings serve as a visual explanation of your invention. They clarify what words alone often can’t. The USPTO requires that every element of the invention described in the claims must also appear in the drawings.
Drawings:
Support the claims made in the application
Help examiners understand complex structures
Prevent ambiguity and misinterpretation
Are legally binding and used in enforcement
Even if the invention seems simple, clear drawings can mean the difference between approval and rejection.
USPTO Utility Patent Drawing Requirements
The USPTO outlines strict guidelines for utility patent drawings. Failing to comply with these can result in office actions and rework. Here’s what the USPTO expects:
Black and White Line Art: Color drawings are only accepted if color is essential to understanding the invention and if a petition is filed.
Size and Margins: 8.5 x 11-inch pages with specific margins (top: 1", left: 1", right: 0.6", bottom: 0.4").
Readable and Uniform: Drawings must be clean, sharp, and to scale.
No Text Inside Drawings: Only reference numbers are allowed.
Consistent Line Styles: Solid lines for visible parts, dashed or broken lines for hidden or optional parts.
Proper Labeling: All parts must be numbered and consistent throughout views.
Choosing the Right Views for Your Invention
The goal of utility drawings is to represent the invention from all necessary perspectives. Depending on the complexity of your design, use a combination of the following:
Front View — Shows the most characteristic side.
Side and Rear Views — Offer additional dimensional context.
Top and Bottom Views — Clarify structure and orientation.
Sectional Views — Reveal internal structures or mechanisms.
Exploded Views — Show how parts fit and interact.
Perspective View (Optional) — Useful for complex geometries.
Each view must be aligned and proportionally accurate. Use multiple sheets if required to ensure every detail is visible and understandable.
Best Practices for Line Work and Labeling
Line styles must convey information clearly and meet legal requirements:
Solid Lines: Represent claimed, visible parts.
Broken Lines: Represent environment, optional parts, or elements not claimed.
Hatching: Used for sectional views to show material or distinguish parts.
Labeling must be:
Done using numerals (e.g., 100, 110, 120…)
Clear and legible
Matched exactly with descriptions in the specification
Avoid labeling elements with letters or descriptive words. Consistency is crucial.
Tools and Software for Creating Utility Drawings
While hand-drawing is technically acceptable, digital tools offer precision and efficiency. Here are popular tools for professional utility patent drawings:
AutoCAD — Industry standard for 2D technical drawings.
SolidWorks — Ideal for mechanical inventions and 3D modeling.
CorelDRAW — Great for vector-based illustrations.
Adobe Illustrator — Useful for clean, high-resolution line art.
SketchUp — Quick 3D concept design with export options.
Many inventors hire professional illustrators who specialize in USPTO-compliant drawings to avoid mistakes and save time.
Common Mistakes to Avoid
Getting drawings wrong can cost you valuable time and money. Here are common pitfalls:
Using color without approval
Including text inside drawings
Not showing all claimed elements
Poor resolution or pixelated lines
Repeating reference numbers for different elements
Incorrect or missing views
Not following required margins and page sizes
Tip: Review the USPTO’s Manual of Patent Examining Procedure (MPEP), Chapter 608.02 for drawing guidelines.
Real-Life Example: Smart Bottle Invention
An inventor designed a smart water bottle that tracks hydration. The utility patent drawings included:
Side view showing the bottle’s shape
Sectional view of the cap with embedded sensors
Exploded view showing the battery, chip, and housing
Perspective view to give an overview of the design
Each part was labeled and described in the written specification. The examiner immediately understood the invention’s structure, resulting in a faster approval process.
Case Study: When Bad Drawings Delay a Patent
A startup submitted a patent for a foldable bicycle. Their drawings were hand-sketched, lacked consistency, and had no reference numbers. The USPTO issued an office action requesting corrected drawings.
They then hired a professional illustrator, who:
Redrew all views to scale using CAD
Added correct labels and line styles
Submitted compliant PDF files
The revised submission passed examination, but the delay cost them 5 months and several hundred dollars in rework.
Advanced Tip: Use Flow Diagrams for Method-Based Inventions
If your invention involves a process or method, consider adding flow diagrams. These are not always required but can:
Clarify how steps relate
Support software or business method claims
Help the examiner visualize functionality
Label each step and make sure it aligns with your written claims.
Frequently Asked Questions
Q1: Do I need to submit utility patent drawings with my provisional patent application? A: No, it’s not mandatory, but it’s highly recommended. Well-prepared drawings strengthen your filing and establish early disclosure.
Q2: Can I draw them myself? A: Yes, but unless you’re trained in technical drawing, mistakes are likely. It’s safer to use software or hire a professional.
Q3: Do I need to include every part of my invention? A: Yes. Every part you describe or claim must appear in the drawings. Omitting elements may weaken your application.
Q4: Are color drawings ever acceptable? A: Only if color is essential to understanding the invention. You must submit a petition and justification.
Q5: How many views should I include? A: Enough to fully disclose the invention. At least front, side, and top views are typical. More complex inventions require sectional and exploded views.
Q6: Can I use photos instead of drawings? A: Only in rare cases and with special approval. The USPTO generally requires line drawings for clarity and legal purposes.
Q7: Will professional drawings increase my approval chances? A: Absolutely. They reduce ambiguity, ensure compliance, and speed up the examination process.
Final Thoughts
Utility patent drawings are a non-negotiable part of the patent application process. They communicate your invention visually and play a critical role in approval. Whether your invention is simple or complex, investing in proper, USPTO-compliant illustrations is one of the smartest steps you can take.
Get USPTO-Compliant Utility Patent Drawings from Experts
Ready to protect your invention with professional, fully compliant patent drawings? Don’t risk costly delays or office actions.
Get started with The Patent Experts now and ensure your drawings meet every USPTO requirement.
#utility patent illustration services#utility patent drawings#patent illustrations#patent drawings#uspto#patent application#patent drafting#utility patent drawing requirements#utility patent drawing examples#uspto patent drawings#utility patent filing#patent line drawings#black and white patent drawings#detailed patent illustrations#invention drawings#technical patent drawings
0 notes